In this
tutorial, we shall go through the various steps of creating a sample android
“Hello World” app. We shall also see how to set up the Eclipse IDE. Once our
application is ready, we will launch the application and see it working on the
Android Virtual Device and also ways to run it on a real android device.
Prerequisites:
1.
JDK 1.6
2.
Eclipse IDE 3.7
3.
Android SDK
The flow of this tutorial
shall be as follows :
1.
Install Android SDK
2.
Install ADT Eclipse plug-in
3.
Create an Android Virtual Device (AVD)
4.
Create an Android Project
5.
Code the app
6.
Run the app on AVD
7.
Run the app on a real android device
1. Install Android SDK
Visit this Android SDK page, select the platform you need, based
on your Operating System and its version - 32 bit (X86) or 64 bit (X64), and install it.
Run the “Android SDK
manager” and choose the Android versions you want to develop your app for.

2. Install ADT Eclipse Plug-in
To integrate the Android
SDK with Eclipse IDE, you need to install Eclipse ADT plug-in. The ADT package
which you downloaded from developer.android.com is compressed and you need to
extract the contents to access the setup files. You may refer to this official
guide - “Installing the ADT Plugin“.

3. Create An Android Virtual Device (AVD)
In Eclipse, you can access the “Android Virtual Device” (AVD) in Eclipse
toolbar. Click “New” to create a new AVD. Select the device, android version
and the processor type. This AVD may then be used to deploy the applications.

4. Create An Android Project
In Eclipse, select “File >
New > Project > Android Project”, and input your application detail.
Eclipse will create all the necessary Android project files and configuration.

Fill in the following fields on
the first screen
·
Application Name: It is the name of your app. This name
is visible on the screen when the app is installed. The application name is
also shown in the android stores when you upload your application.
·
Project Name: It is the name of the project that gets created in
eclipse. You can give any name to your project.
·
Package Name: It is used to uniquely identify your application on Play
Store. You should always follow the java package convention for the package
name. The package name is not visible to the user but it should never change. A
good approach to choose package name is to use the reverse of your company
domain name. For example, if your URL is “example.com” the ideal package name
would be “com.example.android”.
·
Minimum Required SDK: This field gives you the flexibility to
decide which minimum version of android you wish to support. For example, if
you create an application for android 2.2 it will work on all android versions
above android 2.2.
·
Target SDK: This field says that even though your app will be able to
run on its previous android versions, but it is explicitly tested with the version
specified in this field.
·
Compile With: This option lets you choose the version of SDK you wish
to compile with. Typically, the highest version which is available in your ADT
should be chosen here. This would compile your app with the latest code and
optimizations.
·
Theme: When creating apps for version 4.X and above, you may
choose to have an application wide theme. These themes are pre-defined color schemes,
which you can use to improve your application's User Interface.

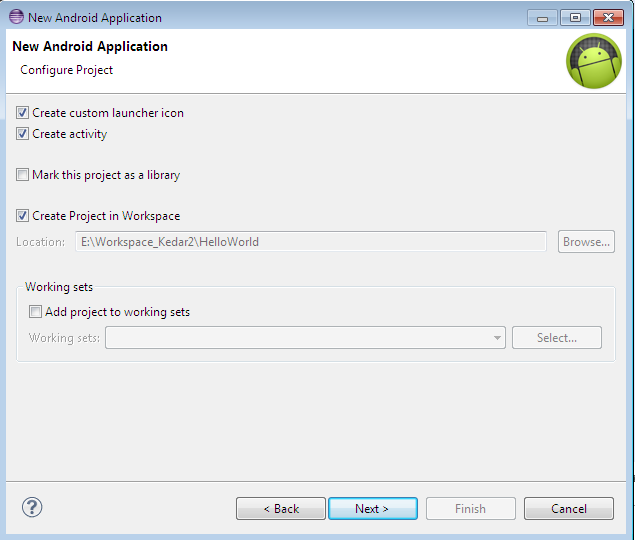
You have the following
fields here:
·
Create Custom Launcher Icon: This icon is the launcher icon which
will be displayed on screen. If this option is checked, ADT will launch a
wizard to create launcher icon. Keep this option selected.
·
Create Activity: With this option selected, ADT will
create the first activity for you. This will be your main activity and will
have a reference in the AndroidManifest.xml file.
·
Mark This project as Library: An android project may be of 2 types:
library project or a non-library project. A library project is a reusable
project which is used by other non library projects. Library project cannot be
installed.
·
Create Project in Workspace: When you open Eclipse for the first
time, it asks you to choose a workspace. Workspace is a location on your hard
disk where all of your projects will be saved. With this checkbox selected, you
tell the ADT to save this project in the current location. If you wish to store
your project at some other location, you can uncheck this option and select the
desired path to save the project
·
Add Project to working sets: Working Set can be used to group similar
projects together. When your number of projects starts increasing, you can
group them together into working sets to avoid seeing all projects while
working. You may ignore this option for now.
If you checked create custom launcher check
box on Screen 2, Screen 3 will be for the creation of launcher icon. On this
screen, you can put together different options to create a launcher icon. You
can choose your own image, text or even your clip-arts. In the right pane, you
can see the preview of the icon. You can experiment with different options like
background color, shape etc and finalize an icon based on preview.

Screen 4 is an
activity template screen. ADT is pre bundled with some activity templates.
These templates have predefined structures and they automatically generate the required
code for you.
·
Blank Activity: This
will create a blank activity with 1 Textview.
·
Full Screen Activity:
This activity hides the status bar so that your activity can take all screen
space.
·
Master Detail Flow:
This template creates advanced navigation, based on fragments, which will work
on both tablets and phones without any change.
For the sake of this
app, select Blank activity and click Next.

This screen is an
Activity configuration screen. This screen helps you in configuring the
relevant options.
·
Activity Name: This will be the name of your activity to be created.
·
Layout Name: An activity always has
a user interface with it. Since ADT is creating an activity for you, it will
also create a layout for you to bind it with the activity.
·
Navigation Type: This option lets you choose the navigation type for your
activity. Select None and click Finish.
Once you click Finish,
a new project and will be created. Java code and Layout code files shall be
opened.
5. Code The App
Locate the generated
activity file, and modify a bit to output a string “Hello World”.
NOTE: If the default java file
is with the name MainActivity.java, do not change the class name to HelloWorld.
File
: HelloWorld.java
package com.example.android;
import android.app.Activity;
import android.os.Bundle;
import android.widget.TextView;
public class HelloWorld extends Activity
{
/*
Called when the activity is first created. */
@Override
public void onCreate(Bundle savedInstanceState)
{
super.onCreate(savedInstanceState);
TextView text = new TextView(this);
text.setText("Hello World");
setContentView(text);
}
}
6. Run the
app on AVD
Run the project as “Android
Application“, choose the AVD and see the output.


7. Run the
app on a real android device
Connect your android device to your PC through the USB cable.
Make sure that USB Debugging is allowed on the device.
* On most devices running Android 3.2 or older, you can find this
option under Settings >
Applications > Development.
* On Android 4.0 and newer, it is in Settings > Developer options.
Run the project as “Android
Application“, choose your android device from the list and see
the output.


No comments:
Post a Comment